Sat night surfchat....week 7,,,,"IRON LURES"..........
Page 1 of 2 • 1, 2 ![]()

Sat night surfchat....week 7,,,,"IRON LURES"..........
![]() skippy 1/6/2010, 10:53 pm
skippy 1/6/2010, 10:53 pm
 Okay back on track, big thanks to Needfish and Smitty for hosting the sat surfchat last week..
 This week our "Monster Builder" host,, is Corey from Iron Lures,,, as always we will give out some lures,,and share some great conversation.....looking forward to hanging with ya'll....peace,,,
 Welcome.... Corey
skippy- Number of posts : 1386
Re: Sat night surfchat....week 7,,,,"IRON LURES"..........
![]() stevel 1/6/2010, 11:33 pm
stevel 1/6/2010, 11:33 pm
lookin forward to havin corey luv his work ....


stevel- S.B.O DONATING MEMBER

- Number of posts : 5196
Re: Sat night surfchat....week 7,,,,"IRON LURES"..........
![]() IRON LURES 1/7/2010, 12:05 am
IRON LURES 1/7/2010, 12:05 am
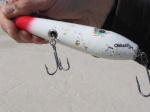
My build is going to be my Slugger popper. Ill start from 4x4 beams and finish at the completed lure. My objective in the build is to give you guys some insight into my process (which is pretty simple) and hopefully inspire you guys to make some wood chips! So lets have some fun!

IRON LURES- SPONSOR

- Number of posts : 264
-

Re: Sat night surfchat....week 7,,,,"IRON LURES"..........
![]() IRON LURES 1/7/2010, 1:35 am
IRON LURES 1/7/2010, 1:35 am
I buy my AYC in different forms, 1.5" balusters, 2x6, or this example 3.5x3.5. I then rip it down into either 1.5" square or 1.625" (1 5/8) depending on what lures im making. The Slugger uses 1.5" stock as do most of my lures. Thanks again to Louis for the lead on the AYC.
[You must be registered and logged in to see this image.]
IRON LURES- SPONSOR
- Number of posts : 264
-
Re: Sat night surfchat....week 7,,,,"IRON LURES"..........
![]() IRON LURES 1/7/2010, 1:44 am
IRON LURES 1/7/2010, 1:44 am
The next step is to mark the center. I use a cheap 3 dollar centerfinder and always mark on all four sides as sometimes the wood isnt exactly square especially when buying it already in baluster form. The final step before going in the lathe is to mark the centers with an all.
[You must be registered and logged in to see this image.]
IRON LURES- SPONSOR
- Number of posts : 264
-
Re: Sat night surfchat....week 7,,,,"IRON LURES"..........
![]() IRON LURES 1/7/2010, 1:52 am
IRON LURES 1/7/2010, 1:52 am
[You must be registered and logged in to see this image.]
I like to write the stock size, and weight sizes, and any other info on the templates with permanent marker.
Next stock goes in the lathe. I recommend upgrading the steb centers, the better ones hold the stock with more contact points which help lower the chances of the wood flying out of the lathe. Always where a face shield, and respirator.
[You must be registered and logged in to see this image.]
I line up the follower with the marks on the templates that indicate the eyes,belly weight, and hook. I then mark the plug with a pencil while the plug is spinning.
[You must be registered and logged in to see this image.]
IRON LURES- SPONSOR
- Number of posts : 264
-
Re: Sat night surfchat....week 7,,,,"IRON LURES"..........
![]() IRON LURES 1/7/2010, 2:03 am
IRON LURES 1/7/2010, 2:03 am
[You must be registered and logged in to see this image.]
The next step is to drill all the appropriate holes. I use fostners as much as possible. I built jigs for each of the size stock i use. The jig is centered directly under the bit so the weights and eyes are perfectly centered in the blank. I dont hydro orient as its not feasible with the amount of lures i make, plus i dont find its worth it on a lure that has a bellyweight.
[You must be registered and logged in to see this image.]
Now the lure goes to the next jig in the chop saw. This jig ensures the poppers are cut all the same, and quickly.
[You must be registered and logged in to see this image.]
IRON LURES- SPONSOR
- Number of posts : 264
-
Re: Sat night surfchat....week 7,,,,"IRON LURES"..........
![]() stevel 1/7/2010, 8:46 am
stevel 1/7/2010, 8:46 am

stevel- S.B.O DONATING MEMBER
- Number of posts : 5196
Re: Sat night surfchat....week 7,,,,"IRON LURES"..........
![]() rocstar21 1/7/2010, 10:25 am
rocstar21 1/7/2010, 10:25 am

rocstar21- Number of posts : 2971
Re: Sat night surfchat....week 7,,,,"IRON LURES"..........
![]() eurojett05 1/7/2010, 3:02 pm
eurojett05 1/7/2010, 3:02 pm

eurojett05- Number of posts : 2453
Re: Sat night surfchat....week 7,,,,"IRON LURES"..........
![]() IRON LURES 1/7/2010, 7:32 pm
IRON LURES 1/7/2010, 7:32 pm
Prior to cutting the end off the front of plug, i center drill the plug body about 1 inch deep to give the cove bit something to center on once the end is chopped off.
next i set up the cove bit in my larger drill press and carve out the popper face, making sure the the plug body is securely gripped in my hand towards the bottom of the plug. Having the square end on the bottom really helps right now. Also note that after doing a few of these, the cove bit gets extremely hot, so be careful when removing it.
Now i put a 1/2" fostners bit in the press to clean up the center of the popper mouth. you only need to kiss it to clean it up. At this point the popper face will be in pretty good shape, but not perfect.
Lastly i wipe a thin layer of cheap elmers wood filler in the popper mouth. I use cheap easily sandable wood filer, as this has to be done by hand.
[You must be registered and logged in to see this image.]
This pic was actually taking after the fostners bit cleaned up the center. The filler also covers up the center mark from the cove bit since this plug is off center drilled.
next i use the band saw to cut the end off the plug.
[You must be registered and logged in to see this image.]
IRON LURES- SPONSOR
- Number of posts : 264
-
Re: Sat night surfchat....week 7,,,,"IRON LURES"..........
![]() IRON LURES 1/7/2010, 8:44 pm
IRON LURES 1/7/2010, 8:44 pm
[You must be registered and logged in to see this image.]
Next step is to glue in the belly weight. I use 2 part epoxy, then wood filler epoxy to cover it over...
[You must be registered and logged in to see this image.]
heres the stuff.
IRON LURES- SPONSOR
- Number of posts : 264
-
Re: Sat night surfchat....week 7,,,,"IRON LURES"..........
![]() IRON LURES 1/7/2010, 10:45 pm
IRON LURES 1/7/2010, 10:45 pm
Next they get a bath in sealer. Opinions vary on sealer, but there are alot of good products on the market. I recommend minwax satin spar urethane, waterlox, or val oil. I let them dry for 48-72 hours or so in a drying cabinet. My drying cabinet stores 96 lures at a time and has a filter on one end and a brushless fan on the other to draw fresh air across the wood.
Once there out from drying i give them a quick scuff with 220 then onto metal rods. This is the last time hand touch the plugs. Next is a dip in primer. i bang the stick on a piece of cardboard to remove excess paint, this helps from getting drips around the eyes and belly hole. I let them dry another 24-48 hours, and finish with a quick sand.
[You must be registered and logged in to see this image.]
I glue a 3 inch piece of vacuum tubing to a welding rod and hook with epoxy. I find this works the best for me as they fit perfectly in my painting stand and rotisserie.
[You must be registered and logged in to see this image.]
IRON LURES- SPONSOR
- Number of posts : 264
-
Re: Sat night surfchat....week 7,,,,"IRON LURES"..........
![]() IRON LURES 1/7/2010, 10:53 pm
IRON LURES 1/7/2010, 10:53 pm
[You must be registered and logged in to see this image.]
Ill go over paint on Saturday night as i dont have time to get any more pics taken till then. Thanks guys.
IRON LURES- SPONSOR
- Number of posts : 264
-
Re: Sat night surfchat....week 7,,,,"IRON LURES"..........
![]() Gremlin 1/7/2010, 11:10 pm
Gremlin 1/7/2010, 11:10 pm
Beautiful tutorial by Iron Lures. Great Job and thanks for taking the time to post and share.
You builders are the best!!!!!

Gremlin- S.B.O DONATING MEMBER
- Number of posts : 452
Re: Sat night surfchat....week 7,,,,"IRON LURES"..........
![]() stevel 1/7/2010, 11:20 pm
stevel 1/7/2010, 11:20 pm
your tutorial is realy great ......thanks for sharing with us
sbo builders are truely the best of the best ...SBO ROCKS ...
stevel- S.B.O DONATING MEMBER
- Number of posts : 5196
Re: Sat night surfchat....week 7,,,,"IRON LURES"..........
![]() Lbifisherman429 1/7/2010, 11:51 pm
Lbifisherman429 1/7/2010, 11:51 pm
so how do you make the metal rods that the plugs are on?
That popper looks great!!
Lbifisherman429- S.B.O DONATING MEMBER
- Number of posts : 391
skippy- Number of posts : 1386
Re: Sat night surfchat....week 7,,,,"IRON LURES"..........
![]() Oldsalts 1/8/2010, 9:15 am
Oldsalts 1/8/2010, 9:15 am
SBO rocks it out...!!!!
I am learning new stuff every build thanks guys...... :read:
Oldsalts- Number of posts : 2037
-
Re: Sat night surfchat....week 7,,,,"IRON LURES"..........
![]() IRON LURES 1/8/2010, 11:10 am
IRON LURES 1/8/2010, 11:10 am
Lbifisherman429 wrote:Corey, Great Job!'
so how do you make the metal rods that the plugs are on?
That popper looks great!!
You can buy the rods in 3 ft lengths from any welding supply store. I cut them in half. You actually buy them by the pound, not per piece.
IRON LURES- SPONSOR
- Number of posts : 264
-
Re: Sat night surfchat....week 7,,,,"IRON LURES"..........
![]() smitty 1/10/2010, 12:08 am
smitty 1/10/2010, 12:08 am
i just got a few new ideas for my shop lol thanks cory...
great info for sure
smitty- Number of posts : 4700
-
Re: Sat night surfchat....week 7,,,,"IRON LURES"..........
![]() NeedFish 1/10/2010, 1:02 am
NeedFish 1/10/2010, 1:02 am
Iron Lures, from left to right
[You must be registered and logged in to see this image.]
1st: oldsalts
2nd: bennyraw
3rd: murph
4th: stevel
5th: gremlin
NeedFish- Number of posts : 63
Re: Sat night surfchat....week 7,,,,"IRON LURES"..........
![]() IRON LURES 1/10/2010, 1:08 am
IRON LURES 1/10/2010, 1:08 am
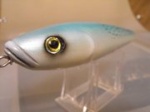
First step, paint it white, i use creatix paint mostly.
[You must be registered and logged in to see this image.]
Next i paint my base colors, this isnt as critcal as the final painting, because most of it is going to be covered up once the netting is layed over the plug.
[You must be registered and logged in to see this image.]
IRON LURES- SPONSOR
- Number of posts : 264
-
Re: Sat night surfchat....week 7,,,,"IRON LURES"..........
![]() IRON LURES 1/10/2010, 1:12 am
IRON LURES 1/10/2010, 1:12 am
I paint the sides with a custom mixed green color, then turquoise from from the top blending over the green.
[You must be registered and logged in to see this image.]
IRON LURES- SPONSOR
- Number of posts : 264
-
Re: Sat night surfchat....week 7,,,,"IRON LURES"..........
![]() IRON LURES 1/10/2010, 1:19 am
IRON LURES 1/10/2010, 1:19 am
[You must be registered and logged in to see this image.]
now take the netting off and it should look similar to this...
[You must be registered and logged in to see this image.]
Now epoxy glue in your eye, lip, and belly grommets.
Then time for top coat!
IRON LURES- SPONSOR
- Number of posts : 264
-
Page 1 of 2 • 1, 2 ![]()
» Week 14 Monster,,, " Black Label Lures "....
» Sat-night surf-chat, Week 9 monster builder, "Bluesfish"
» Sat-night surf chat,,, Week 16,," Monster Builder ",,,Smitty....
» Sat-night surf chat,,, Week 8 " Monster Builder ",,,Bennyraw....
» Here is your new member from NJ.
» Greetings from the west coast.
» Newbie here
» Cooler Rack for front of truck
» "Purple Heron"
» Another Classic Conversion
» A BAKERS DOZ !
» WINTERS OVER !
» Classic Conversion !