Week 3 Monster Build...Alphabaits..Handcarved Herring
Page 1 of 2 • 1, 2 ![]()

Week 3 Monster Build...Alphabaits..Handcarved Herring
![]() Alphabaits 12/9/2009, 9:08 pm
Alphabaits 12/9/2009, 9:08 pm
I started out with a piece of Alaskan yellow cedar 1" thick X 1 7/8 wide. I trace my outline from my template onto the wood.
[You must be registered and logged in to see this image.]
Then I cut out the blank on the bandsaw.
[You must be registered and logged in to see this image.]
Then while the blank is still flat I cut my lip slot and drill through the eye mark with a very small drill bit all the way through the blank. This keeps you eye lined up on both sides. I will show this later.
[You must be registered and logged in to see this image.]
Now I start to lay out my lines on the bait. I have a collection of small sections of lexan and polycarbonate that I lay flat on the table to make a mark on the bait that will be equal on both sides and eliminates the need for a centerline or measuring. I use a thicker section for my tail marks for a thinner tail. I use a thinner section for my head marks for a thicker head section.
[You must be registered and logged in to see this image.]
Then I just connect all the marks with a flexible metal ruler. Here is what it looks like all laid out.
[You must be registered and logged in to see this image.]
I'll post more in a bit.
Alphabaits- Number of posts : 86
hey ted..
![]() skippy 12/9/2009, 9:28 pm
skippy 12/9/2009, 9:28 pm
Alphabaits wrote:First I would just like to thank Smitty for a great site and Skippy for asking me to be involved with such a great bunch of builders. I wanted to do something different but also wanted to stay within the one week build deal. I went with something I'm familiar with but went with a new shape and different lip setup than I usually do. So here's my Monster.
I started out with a piece of Alaskan yellow cedar 1" thick X 1 7/8 wide. I trace my outline from my template onto the wood.
[You must be registered and logged in to see this image.]
Then I cut out the blank on the bandsaw.
[You must be registered and logged in to see this image.]
Then while the blank is still flat I cut my lip slot and drill through the eye mark with a very small drill bit all the way through the blank. This keeps you eye lined up on both sides. I will show this later.
[You must be registered and logged in to see this image.]
Now I start to lay out my lines on the bait. I have a collection of small sections of lexan and polycarbonate that I lay flat on the table to make a mark on the bait that will be equal on both sides and eliminates the need for a centerline or measuring. I use a thicker section for my tail marks for a thinner tail. I use a thinner section for my head marks for a thicker head section.
[You must be registered and logged in to see this image.]
Then I just connect all the marks with a flexible metal ruler. Here is what it looks like all laid out.
[You must be registered and logged in to see this image.]
I'll post more in a bit.
 Thanks for sharing,we all know your plugs have a rep. for catching,
 great of you to share your plugbuilding knowledge with us. thanks
skippy- Number of posts : 1386
Re: Week 3 Monster Build...Alphabaits..Handcarved Herring
![]() Alphabaits 12/9/2009, 11:09 pm
Alphabaits 12/9/2009, 11:09 pm
[You must be registered and logged in to see this image.]
I have a set of magnetic rubber jaw pads that I use to get a grip on the plug while I shape it. They are great as you can use a good bit of pressure and not mar the wood at all.
[You must be registered and logged in to see this image.]
I chuck up the bait in the vice and use a strip of sanding belt to shape the bait. I use a piece of used 80 grit belt as it removes enough wood easily but is not overly aggressive.
[You must be registered and logged in to see this image.]
I just keep flipping end to end and front to back and keep an eye on keeping things even.
[You must be registered and logged in to see this image.]
At this point I will take a forstner bit on my hand drill and using the small holes I drilled earlier as a pilot drill my eye holes.
[You must be registered and logged in to see this image.]
Now I will do some hand sanding with a sanding sponge and the bait in my hand. I use a medium grit sponge in the 150 range for this. Now the bait is taking shape.
I will do a final sand with a piece of paper and smooth out all the sanding marks. And the bait is starting to take shape.
[You must be registered and logged in to see this image.]
I wanted to do a full sealed bait but with the one week time frame I thought I would just do grommet and tail wrap. I drill for my grommet which I recess and drill for my belly weight.
[You must be registered and logged in to see this image.]
Now into sealer and primer and we will be ready for paint.
[You must be registered and logged in to see this image.]
Alphabaits- Number of posts : 86
Re: Week 3 Monster Build...Alphabaits..Handcarved Herring
![]() Bluesfish 12/9/2009, 11:44 pm
Bluesfish 12/9/2009, 11:44 pm
Bluesfish

Bluesfish- S.B.O DONATING MEMBER

- Number of posts : 2679
Re: Week 3 Monster Build...Alphabaits..Handcarved Herring
![]() IRON LURES 12/10/2009, 10:28 am
IRON LURES 12/10/2009, 10:28 am
thanks for the how-to, looks
 awesome!
IRON LURES- SPONSOR

- Number of posts : 264
-

Re: Week 3 Monster Build...Alphabaits..Handcarved Herring
![]() rocstar21 12/10/2009, 11:21 am
rocstar21 12/10/2009, 11:21 am


rocstar21- Number of posts : 2971
Re: Week 3 Monster Build...Alphabaits..Handcarved Herring
![]() etch 12/10/2009, 2:06 pm
etch 12/10/2009, 2:06 pm
big fan of your work drool drool drool Etch

etch- Number of posts : 1193
-
Re: Week 3 Monster Build...Alphabaits..Handcarved Herring
![]() Alphabaits 12/10/2009, 8:02 pm
Alphabaits 12/10/2009, 8:02 pm
[You must be registered and logged in to see this image.]
Something I like that I have been playing around with lately is painting the backs of clear eyes to get some other colors that are not so standard. The options are really endless with these as you can paint whatever color you want and also add dots or stripes or whatever you want to them. I just hold the eye in a pair of forcepts and shoot whatever color I want then hit it with a hair dryer to dry it and they are ready to go on.
[You must be registered and logged in to see this image.]
Alphabaits- Number of posts : 86
Re: Week 3 Monster Build...Alphabaits..Handcarved Herring
![]() bennyraw 12/10/2009, 9:51 pm
bennyraw 12/10/2009, 9:51 pm
bennyraw- Number of posts : 222
Re: Week 3 Monster Build...Alphabaits..Handcarved Herring
![]() fish factor 12/10/2009, 10:59 pm
fish factor 12/10/2009, 10:59 pm

fish factor- S.B.O DONATING MEMBER
- Number of posts : 2092
Re: Week 3 Monster Build...Alphabaits..Handcarved Herring
![]() Alphabaits 12/11/2009, 8:08 pm
Alphabaits 12/11/2009, 8:08 pm
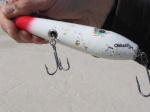
[You must be registered and logged in to see this image.]
I let it dry overnight and then cleared it with a coat of two part epoxy.
[You must be registered and logged in to see this image.]
Took it out for a final run in the little tidal creek near my house. Here's what I ended up with. Video is off my camera and pretty bad but it gives you an idea.
[You must be registered and logged in to see this link.]
This was fun and I enjoyed it. Like I said I tried to stay within the one week period given for this. I would have like to have tried a few different weight schemes but was running out of time and weather. Thanks everyone and I hope that someone gets a little something they can use from this. Thanks.
Ted [The Greek]
Alphabaits- Number of posts : 86
Re: Week 3 Monster Build...Alphabaits..Handcarved Herring
![]() FJR 12/11/2009, 8:58 pm
FJR 12/11/2009, 8:58 pm

FJR- S.B.O DONATING MEMBER
- Number of posts : 1577
wow ted...
![]() skippy 12/11/2009, 10:15 pm
skippy 12/11/2009, 10:15 pm
skippy- Number of posts : 1386
Re: Week 3 Monster Build...Alphabaits..Handcarved Herring
![]() bennyraw 12/11/2009, 10:49 pm
bennyraw 12/11/2009, 10:49 pm
Your video didn't load right though.
[You must be registered and logged in to see this link.]
bennyraw- Number of posts : 222
Re: Week 3 Monster Build...Alphabaits..Handcarved Herring
![]() rocstar21 12/11/2009, 10:57 pm
rocstar21 12/11/2009, 10:57 pm
HELL OF A JOB! [You must be registered and logged in to see this image.]
rocstar21- Number of posts : 2971
Re: Week 3 Monster Build...Alphabaits..Handcarved Herring
![]() eurojett05 12/12/2009, 12:07 am
eurojett05 12/12/2009, 12:07 am

eurojett05- Number of posts : 2453
Re: Week 3 Monster Build...Alphabaits..Handcarved Herring
![]() Minivin5 12/12/2009, 10:22 am
Minivin5 12/12/2009, 10:22 am

Minivin5- S.B.O DONATING MEMBER
- Number of posts : 1449
Re: Week 3 Monster Build...Alphabaits..Handcarved Herring
![]() Alphabaits 12/12/2009, 7:20 pm
Alphabaits 12/12/2009, 7:20 pm
[You must be registered and logged in to see this image.]
Alphabaits- Number of posts : 86
Re: Week 3 Monster Build...Alphabaits..Handcarved Herring
![]() Oldsalts 12/12/2009, 8:21 pm
Oldsalts 12/12/2009, 8:21 pm
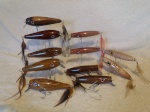
Alphabaits wrote:Here's some stuff I'll be giving away tonight.
[You must be registered and logged in to see this image.]
Awesome and great tutorial you know i will be there tonight ....SBO Rocks... [You must be registered and logged in to see this image.]
Thanks for taking part in this great Monster Build...
[You must be registered and logged in to see this image.]
Oldsalts- Number of posts : 2037
-
Re: Week 3 Monster Build...Alphabaits..Handcarved Herring
![]() stevel 12/12/2009, 10:33 pm
stevel 12/12/2009, 10:33 pm

stevel- S.B.O DONATING MEMBER
- Number of posts : 5196
Re: Week 3 Monster Build...Alphabaits..Handcarved Herring
![]() Bluesfish 12/13/2009, 12:24 am
Bluesfish 12/13/2009, 12:24 am
What guage thru wire do you use, and how much does that plug weigh when completed?
Thanks,
Bluesfish
Bluesfish- S.B.O DONATING MEMBER
- Number of posts : 2679
hey guys....
![]() skippy 12/13/2009, 11:06 pm
skippy 12/13/2009, 11:06 pm
skippy- Number of posts : 1386
Re: Week 3 Monster Build...Alphabaits..Handcarved Herring
![]() bennyraw 12/14/2009, 12:47 am
bennyraw 12/14/2009, 12:47 am
Unfortunately I'm going to miss most of next week too

bennyraw- Number of posts : 222
hey benny
![]() skippy 12/14/2009, 12:59 am
skippy 12/14/2009, 12:59 am
you won a plug from alphabaits, and jamie won yours. thanksbennyraw wrote:I was bummed that I didn't get to pick your brain a bit Ted, You're definitely among my favorite builders.
Unfortunately I'm going to miss most of next week too
skippy- Number of posts : 1386
Re: Week 3 Monster Build...Alphabaits..Handcarved Herring
![]() black talon 12/14/2009, 2:41 pm
black talon 12/14/2009, 2:41 pm
black talon- Number of posts : 342
Page 1 of 2 • 1, 2 ![]()
» week 6 monster,,,,1/02/10 fill in build for the chat "bunker swimmer"
» Week 12 "Monster Build".........FJR......Handcarve Bunker.
» week 5 monster,,Christmas Week Surfchat!
» Monster Builder week 13......The Rowhunter.........
» Here is your new member from NJ.
» Greetings from the west coast.
» Newbie here
» Cooler Rack for front of truck
» "Purple Heron"
» Another Classic Conversion
» A BAKERS DOZ !
» WINTERS OVER !
» Classic Conversion !