Monster Builder week 13......The Rowhunter.........
+10
etch
fatfingers
holymackeral
Oldsalts
Gremlin
Rowhunter
Bluesfish
stevel
rocstar21
skippy
14 posters
Page 1 of 1

Monster Builder week 13......The Rowhunter.........
![]() skippy 2/18/2010, 8:02 pm
skippy 2/18/2010, 8:02 pm
 This weeks surfchat sponsor is Rowhunter, nuff said place will be packed,,,
gonna givaway a high hook pencil, and a Black label slider kit,, "thanks guys for your donations"
10 pm sat night on the chat room

skippy- Number of posts : 1386
also
![]() skippy 2/18/2010, 8:04 pm
skippy 2/18/2010, 8:04 pm
Hey douglas, please bring some canoe pics.. :read:
Last edited by skippy on 2/18/2010, 9:44 pm; edited 1 time in total
skippy- Number of posts : 1386

rocstar21- Number of posts : 2971
Re: Monster Builder week 13......The Rowhunter.........
![]() stevel 2/18/2010, 9:45 pm
stevel 2/18/2010, 9:45 pm
one of ....SBO'S GREATS.......gonna be a good one again.....SBO ROCKS...... 

stevel- S.B.O DONATING MEMBER

- Number of posts : 5196
Re: Monster Builder week 13......The Rowhunter.........
![]() Bluesfish 2/18/2010, 11:50 pm
Bluesfish 2/18/2010, 11:50 pm
This is gonna be a good one 
Blues
Blues
Bluesfish- S.B.O DONATING MEMBER
- Number of posts : 2679
"And now, something completely different"..,
![]() Rowhunter 2/20/2010, 2:10 pm
Rowhunter 2/20/2010, 2:10 pm
Hey guy's (and gals), due to a shop renovation that has eaten way more time than it should have, it would be real tough to crank out a decent piece right now. To top things off, my lathe decided to stop working as well, and the controller is now in Pennsylvania! So, if you don't mind, I thought I'd shed some light on my take of the resin molding process.
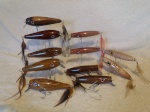
First off understand that there is nothing that can beat that special wooden lure. You know the one, that one that maybe even rolled off a duplicator ,but somehow always outperforms it's peers. It's the variances in wood that will give us that magic one, the O.K. ones and the fire pit fillers. Duplication is where the resin will shine once you have the proper mixture for the piece you are casting. I use the resins from Alumalite and it is a simple 1 to 1 mix ratio. Mix 1 part A with 1 part B and in a little over a minute the resin is solid, the only problem with that is that it will sink like a stone! This is where you'll need to add a product for buoyancy ,Alumalite recommends microballoons. Up to 100% can be added to the resin mixture and that thing will float like a cork, probably way too much! This is where you change your mix formula to suit your density requirements. Once you have this, and the rest of your procedure set, it is relatively simple to replicate your prototype's characteristics.
Making a mold. There are several way's to do this heres how I've done it. Cut a length of PVC tubing lengthwise somewhere close to the center, this is the backing for the RTV silicone. Build up one of the halves with clay and imbed your chosen master in the clay as close to dead center as possible. Join the two sections of PVC , tape the seams and hot glue one of the ends down to a scrap piece of plastic or tile. Mix and pour your chosen RTV down the open cavity. After 18 to 24 hours, remove the PVC from the base and separate the mold , try to keep the master imbedded in the RTV and remove all of the clay. Re-tape, re-hot glue and pour the other half. Congratulations, you now have a 2 piece mold. Now just drill a pour hole and cut away some RTV from it so the resin can flow freely, I use 3/8" hole. This two piece mold will let you mold in a pre-formed wire. Again, this is only one way to do this. You could choose to do a 1 piece mold ,and bore holes for a through wire and belly hook after molding ,just as you would to a wood piece. Screw eyes are also an option.
Some good things about resin are its ability to be quickly replicated, no need to seal to prevent decay, strength, and the fact that unlike injected plastic production pieces a resin unit is solid.
Not so good, it really can take a lot of prep to come up with a piece that has a near perfect finish for paint ,cue "Tiny Bubbles", can be messy, start up cost , and it's not WOOD!
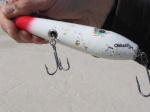
Now, I hope I've answered some questions because I really need to get back to my shop, here are some pic's.
See you tonight in the Chat , I will be giving away the Herring pictured at the end!
Douglas[img][You must be registered and logged in to see this link.][/img][img][You must be registered and logged in to see this link.][/img][img][You must be registered and logged in to see this link.][/img][img][You must be registered and logged in to see this link.][/img][img][You must be registered and logged in to see this link.][/img][img][You must be registered and logged in to see this link.][/img][img][You must be registered and logged in to see this link.][/img][img][You must be registered and logged in to see this link.][/img][img][You must be registered and logged in to see this link.][/img]
First off understand that there is nothing that can beat that special wooden lure. You know the one, that one that maybe even rolled off a duplicator ,but somehow always outperforms it's peers. It's the variances in wood that will give us that magic one, the O.K. ones and the fire pit fillers. Duplication is where the resin will shine once you have the proper mixture for the piece you are casting. I use the resins from Alumalite and it is a simple 1 to 1 mix ratio. Mix 1 part A with 1 part B and in a little over a minute the resin is solid, the only problem with that is that it will sink like a stone! This is where you'll need to add a product for buoyancy ,Alumalite recommends microballoons. Up to 100% can be added to the resin mixture and that thing will float like a cork, probably way too much! This is where you change your mix formula to suit your density requirements. Once you have this, and the rest of your procedure set, it is relatively simple to replicate your prototype's characteristics.
Making a mold. There are several way's to do this heres how I've done it. Cut a length of PVC tubing lengthwise somewhere close to the center, this is the backing for the RTV silicone. Build up one of the halves with clay and imbed your chosen master in the clay as close to dead center as possible. Join the two sections of PVC , tape the seams and hot glue one of the ends down to a scrap piece of plastic or tile. Mix and pour your chosen RTV down the open cavity. After 18 to 24 hours, remove the PVC from the base and separate the mold , try to keep the master imbedded in the RTV and remove all of the clay. Re-tape, re-hot glue and pour the other half. Congratulations, you now have a 2 piece mold. Now just drill a pour hole and cut away some RTV from it so the resin can flow freely, I use 3/8" hole. This two piece mold will let you mold in a pre-formed wire. Again, this is only one way to do this. You could choose to do a 1 piece mold ,and bore holes for a through wire and belly hook after molding ,just as you would to a wood piece. Screw eyes are also an option.
Some good things about resin are its ability to be quickly replicated, no need to seal to prevent decay, strength, and the fact that unlike injected plastic production pieces a resin unit is solid.
Not so good, it really can take a lot of prep to come up with a piece that has a near perfect finish for paint ,cue "Tiny Bubbles", can be messy, start up cost , and it's not WOOD!
Now, I hope I've answered some questions because I really need to get back to my shop, here are some pic's.
See you tonight in the Chat , I will be giving away the Herring pictured at the end!
Douglas[img][You must be registered and logged in to see this link.][/img][img][You must be registered and logged in to see this link.][/img][img][You must be registered and logged in to see this link.][/img][img][You must be registered and logged in to see this link.][/img][img][You must be registered and logged in to see this link.][/img][img][You must be registered and logged in to see this link.][/img][img][You must be registered and logged in to see this link.][/img][img][You must be registered and logged in to see this link.][/img][img][You must be registered and logged in to see this link.][/img]

Rowhunter- Number of posts : 110
hey douglas.....
![]() skippy 2/20/2010, 2:19 pm
skippy 2/20/2010, 2:19 pm
Oh my god, are you kiddin me?I can not wait to come back... 
skippy- Number of posts : 1386

stevel- S.B.O DONATING MEMBER
- Number of posts : 5196
Re: Monster Builder week 13......The Rowhunter.........
![]() Gremlin 2/20/2010, 7:46 pm
Gremlin 2/20/2010, 7:46 pm
Very nice layout on the resin molds. Great job!
Thanks Douglas.
Jamie
Hopefully I'll be back in the Surfchat tonight.....unless work gets in the way yet again.
Thanks Douglas.
Jamie
Hopefully I'll be back in the Surfchat tonight.....unless work gets in the way yet again.

Gremlin- S.B.O DONATING MEMBER
- Number of posts : 452
what a deal.....
![]() skippy 2/20/2010, 10:09 pm
skippy 2/20/2010, 10:09 pm
Just great, I have read it twice, great great pics. incredible right through the finish...wow
skippy- Number of posts : 1386
Re: Monster Builder week 13......The Rowhunter.........
![]() Oldsalts 2/20/2010, 10:48 pm
Oldsalts 2/20/2010, 10:48 pm
Wow Douglas
Man that a sweet....!!!
Thanks for the how too, thats a really cool way to reproduce a great shape ...!!!!
Thanks for sharing
Ed
Man that a sweet....!!!
Thanks for the how too, thats a really cool way to reproduce a great shape ...!!!!
Thanks for sharing
Ed
Oldsalts- Number of posts : 2037
-

Re: Monster Builder week 13......The Rowhunter.........
![]() holymackeral 2/20/2010, 11:05 pm
holymackeral 2/20/2010, 11:05 pm
that is some great stuff..... all you plug builders make this stuff look easy.... too bad it's not...
holymackeral- S.B.O DONATING MEMBER
- Number of posts : 1383
Re: Monster Builder week 13......The Rowhunter.........
![]() rocstar21 2/21/2010, 7:56 am
rocstar21 2/21/2010, 7:56 am
DOUG, GREAT JOB BRO ON THE TUTORIAL........... YOU ARE A TRULY TALENTED MAN...... I RELLY ENJOY SEEING YOUR WORK! I THINK YOU ARE THE FIRST HERE TO SHOW HOW TO DO THE RESEIN MOLDS............ I WAS WONDERING HOW IT WAS DONE........ YOUR HANDCARVES, MOLDING, AND PAINT WORK IS OUTSTANDING!!!
rocstar21- Number of posts : 2971
Re: Monster Builder week 13......The Rowhunter.........
![]() fatfingers 2/21/2010, 10:56 am
fatfingers 2/21/2010, 10:56 am
The display of precision in your work always amazes me.
Quetion:
How do you cut the lip slot accurately and squarely?
Did you build a jig?
Have you ever considered cutting the lip slot on the master lure before making the mold?
Quetion:
How do you cut the lip slot accurately and squarely?
Did you build a jig?
Have you ever considered cutting the lip slot on the master lure before making the mold?

fatfingers- Number of posts : 171
Re: Monster Builder week 13......The Rowhunter.........
![]() Bluesfish 2/21/2010, 11:22 am
Bluesfish 2/21/2010, 11:22 am
As a plasterer, I've learned the skills and patience it takes to do orinamental plaster design...but this is on a totally diff. scale  :wow !!!! Some really sick skills you have!
Bluesfish
:wow !!!! Some really sick skills you have!Bluesfish
Bluesfish- S.B.O DONATING MEMBER
- Number of posts : 2679
Re: Monster Builder week 13......The Rowhunter.........
![]() etch 2/21/2010, 12:34 pm
etch 2/21/2010, 12:34 pm
awesome row, amazing work you do, here are some questions, how does one caculate the fromula for an A TO B to mirco ballon ratio for the plug they want to pour?? and if you need it bouyant like a top water( basswood/cedar) will over loading the A to B and ballons, make it tough to pour or mix for that matter? will you end up with voids? soft spots, (uncured i will call them) in the plug, thanxs
Etch
Etch

etch- Number of posts : 1193
-
Re: Monster Builder week 13......The Rowhunter.........
![]() first2wins 2/21/2010, 2:47 pm
first2wins 2/21/2010, 2:47 pm
I can see giving this a try next winter

first2wins- Number of posts : 210
Re: Monster Builder week 13......The Rowhunter.........
![]() FJR 2/21/2010, 3:38 pm
FJR 2/21/2010, 3:38 pm
Excellent job !!! Your work is right there at the top !!! Beautiful stuff. Wait til Ted sees this !!!

FJR- S.B.O DONATING MEMBER
- Number of posts : 1577
Re: Monster Builder week 13......The Rowhunter.........
![]() Rowhunter 2/21/2010, 8:34 pm
Rowhunter 2/21/2010, 8:34 pm
Thanks for the feedback guys, I hope it helps a little. To answer a couple more questions, Fatfingers, yes I've made a simple jig to cut the lip slot for that one. The reason I chose not to mold it is because I use different lips at different angles for different applications. The jig is EZ to use and quite quick. Etch ,too many microballoons can seriously effect the resins strength. It becomes very porous, like a honeycomb. It's really not that hard to get the proper mixture.
Douglas
Douglas
Rowhunter- Number of posts : 110
Re: Monster Builder week 13......The Rowhunter.........
![]() Rowhunter 2/22/2010, 11:09 pm
Rowhunter 2/22/2010, 11:09 pm
It has been brought to my attention that I forgot to mention one very important step in the mold making process. That step is to use some type of mold release agent on your first half RTV ,before you pour the second half! This is funny because I caught myself when doing the popper ,just in time. The only thing RTV sticks to is RTV!
Douglas
Thanks John
Douglas
Thanks John
Rowhunter- Number of posts : 110
Re: Monster Builder week 13......The Rowhunter.........
![]() Loki 2/24/2010, 2:06 am
Loki 2/24/2010, 2:06 am
Beautiful work, thank-you- It must have been a pain in the butt to get the details perfect on your models for the mold.

Loki- Number of posts : 61
Re: Monster Builder week 13......The Rowhunter.........
![]() Minivin5 3/5/2010, 2:23 pm
Minivin5 3/5/2010, 2:23 pm
Damn that was an amazing walk through....you shop looks so clean and organized....

Minivin5- S.B.O DONATING MEMBER
- Number of posts : 1449
» Week 2 Monster Builder, " Old Salts...Pencil Popper Old School
» Sat-night surf chat,,, Week 16,," Monster Builder ",,,Smitty....
» Sat-night surf chat,,, Week 8 " Monster Builder ",,,Bennyraw....
» Sat-night surf-chat, Week 9 monster builder, "Bluesfish"
» week 10 monster builder is" Doc popper "...
» Sat-night surf chat,,, Week 16,," Monster Builder ",,,Smitty....
» Sat-night surf chat,,, Week 8 " Monster Builder ",,,Bennyraw....
» Sat-night surf-chat, Week 9 monster builder, "Bluesfish"
» week 10 monster builder is" Doc popper "...
Page 1 of 1
Permissions in this forum:
You cannot reply to topics in this forum
» Here is your new member from NJ.
» Greetings from the west coast.
» Newbie here
» Cooler Rack for front of truck
» "Purple Heron"
» Another Classic Conversion
» A BAKERS DOZ !
» WINTERS OVER !
» Classic Conversion !