Week 12 "Monster Build".........FJR......Handcarve Bunker.
+15
Bluesfish
first2wins
fish factor
etch
bennyraw
black talon
rocstar21
IRON LURES
skippy
Murphthesurf
Kevnmary
eurojett05
stevel
fishnh
FJR
19 posters
Page 1 of 2
Page 1 of 2 • 1, 2 ![]()

Week 12 "Monster Build".........FJR......Handcarve Bunker.
![]() FJR 2/10/2010, 11:05 am
FJR 2/10/2010, 11:05 am
Welcome to FJR’s Monster Build
This plug can be built with basic hand tools for those of you that don’t have power equipment. You can use screw eyes instead of thru wire. Stick on eyes or paint your own eyes and the lip slot can be done with a hand saw. You could even use a hand drill for the belly weight.
Step 1 - The type of wood you use is important, as this is a large plug and weight is a factor. Pine would be a good chose to try for the first one, as it is easy to work with. For this build I will be using Cedar ( don’t know what kind ), when finished this plug will be 8 3/4" long and weight between 2.25 & 2.50 oz.
I start by selecting a template that I made from a design I first did on paper. The challenge here is to come up with a design of your own and make it work. I have a number of sizes and variations that I use.
[You must be registered and logged in to see this image.]
Then I trace out the pattern on the piece of cedar.
[You must be registered and logged in to see this image.]
Step 2 - Next I cut it out on a band saw and do the lip slot while it’s still flat. For those of you that don’t have a band saw, you can use a scroll saw, jig saw or even a coping saw.
[You must be registered and logged in to see this image.]
Step 3 - To shape the plug I use two methods, depends on what mood I’m in lol. For this demo I will use the method that was shown to me by Alphabaits (Ted) where you use a 1"strip of sand paper cut from a belt sander. I start out with 50 grit to get the basic shape then switch to 80 grit to smooth things out.
The other method is to use a rasp, takes longer, by you don’t get all the dust like with the sanding method.
[You must be registered and logged in to see this image.]

FJR- S.B.O DONATING MEMBER

- Number of posts : 1577
More
![]() FJR 2/10/2010, 11:20 am
FJR 2/10/2010, 11:20 am
Place the cut out blank in the vise and start sanding, as my grandson says, like you were drying your back after a nice hot shower. I always start with the top first and then the bottom and finish off the sides. An option here would be to leave the sides flat, I like to round them off, the choice is yours.
If you chose the rasp method, doesn’t matter where you start, just as long as it’s the corners and do a little at a time constantly turning the plug as you go.
One thing I advise to do, if sanding, is to wear a dust mask and as you can see in the photo, I have my shop vac set up under the plug to help keep the dust down. Unless of course you enjoy breathing and choking on wood dust.
[You must be registered and logged in to see this image.]
The next photo shows how the plug looks half way done. Flip it over and finish it off. I have a set of plastic jaws, same as Alphabaits uses, to keep from damaging the plug in the vise.
[You must be registered and logged in to see this image.]
Step 4 - After the plug is shaped I then hand sand it with either a block of wood and sandpaper or with a sanding sponge, sometimes I use both. This is to even everything out, as there will be high and low spots.
[You must be registered and logged in to see this image.]
FJR- S.B.O DONATING MEMBER
- Number of posts : 1577
More
![]() FJR 2/10/2010, 11:29 am
FJR 2/10/2010, 11:29 am
Step 5 - Next I drill the thru hole, if you plan on using screw eyes skip this step. I have a board with a dowel center in it and I line it up with a steel rod that is inserted in the chuck. ( Thanks to Roccus )
[You must be registered and logged in to see this image.]
First I drill the nose then I flip it over and drill the tail. I finish it off with a hand drill. Next I do the belly, weight hole and the eyes. The size of these holes is up to you, it will depend on what size weight you use, whether you decide to make a sealed plug or use swivels and what size eyes. All choices you’ll need to make. On this plug I’m using 23/64 th for the hook hangers, 15/32 nd for the belly weight and 7/16 th for the eyes.
[You must be registered and logged in to see this image.]
Step 6 - A little finish sanding, rounding off all edges and onto the sealer. I use a 50/50 mixture of spar and mineral spirits. Normally it takes three dips, allowing it to fully dry in-between coats, to get it the way I like.
[You must be registered and logged in to see this image.]
Step 7 - After the sealer has had time to dry I then assemble the plug and fill all the cavities with two part epoxy to create a fully sealed plug. After the epoxy has dried I sand everything smooth and apply a coat of min wax sanding sealer, really locks everything in nicely.
[You must be registered and logged in to see this image.]
[You must be registered and logged in to see this image.]
First I drill the nose then I flip it over and drill the tail. I finish it off with a hand drill. Next I do the belly, weight hole and the eyes. The size of these holes is up to you, it will depend on what size weight you use, whether you decide to make a sealed plug or use swivels and what size eyes. All choices you’ll need to make. On this plug I’m using 23/64 th for the hook hangers, 15/32 nd for the belly weight and 7/16 th for the eyes.
[You must be registered and logged in to see this image.]
Step 6 - A little finish sanding, rounding off all edges and onto the sealer. I use a 50/50 mixture of spar and mineral spirits. Normally it takes three dips, allowing it to fully dry in-between coats, to get it the way I like.
[You must be registered and logged in to see this image.]
Step 7 - After the sealer has had time to dry I then assemble the plug and fill all the cavities with two part epoxy to create a fully sealed plug. After the epoxy has dried I sand everything smooth and apply a coat of min wax sanding sealer, really locks everything in nicely.
[You must be registered and logged in to see this image.]
FJR- S.B.O DONATING MEMBER
- Number of posts : 1577
Re: Week 12 "Monster Build".........FJR......Handcarve Bunker.
![]() fishnh 2/10/2010, 11:34 am
fishnh 2/10/2010, 11:34 am
wow. nice sweet step by step. I might have to try one of those 

fishnh- Number of posts : 375
More
![]() FJR 2/10/2010, 11:38 am
FJR 2/10/2010, 11:38 am
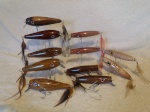
Step 8 - Now that all the hard stuff is done it’s time to paint. This is where you can let your creative juices flow. Since I don’t have any artistic ability I will keep it simple. For lack of a better term I will call this a bunker pattern.
First a light sanding then a primer. I normally use Rustoleum spray primer.
[You must be registered and logged in to see this image.]
I then apply a coat of silver pearl.
[You must be registered and logged in to see this image.]
Follow that up with gold pearl on the top and shoulders.
[You must be registered and logged in to see this image.]
On this pattern I chose to use pearl green for the top. This is where you can get creative if you want, 49er fans could use red, Saints fans, black or some other shade of green or blue. I have come up with some nice shades of green by mixing colors. Play around, that’s what makes it fun.
[You must be registered and logged in to see this image.]
FJR- S.B.O DONATING MEMBER
- Number of posts : 1577
Re: Week 12 "Monster Build".........FJR......Handcarve Bunker.
![]() stevel 2/10/2010, 11:40 am
stevel 2/10/2010, 11:40 am
wow frank awsome tutorial ....u make it look easy but i know it isnt..... 
big fan of your work u know that....work is truely art ......
big fan of your work u know that....work is truely art ......

stevel- S.B.O DONATING MEMBER
- Number of posts : 5196
The End
![]() FJR 2/10/2010, 11:41 am
FJR 2/10/2010, 11:41 am
I finish it off with a light shade of purple, that is a mix of silver pearl and purple pearl, under the eyes and add some dots along the body. At this point I give it a light coat of clear acrylic.
[You must be registered and logged in to see this image.]
After it has dried give it a coat of your favorite top coat. I like E-Trex the best and usually give it two coats. I find Devcon dries to fast for me to completely cover this size plug, I will use it on smaller freshwater plugs as I do like the way it comes out. The choice is yours, there is no right or wrong.
There you have it, looks pretty good with out being too complicated.
[You must be registered and logged in to see this image.]
I want to say thanks to Smitty for providing this fun site, Skippy for inviting me to do this build, Ted for showing me how and Keith for the painting lessons along with loads of plug theory.
I enjoyed presenting this build and I hope everyone got at least something from this build. Good luck to anyone that tries it.
One last thing, don’t forget the Saturday night chat at 10 pm, where this plug will be raffled off. See you there.
[You must be registered and logged in to see this image.]
After it has dried give it a coat of your favorite top coat. I like E-Trex the best and usually give it two coats. I find Devcon dries to fast for me to completely cover this size plug, I will use it on smaller freshwater plugs as I do like the way it comes out. The choice is yours, there is no right or wrong.
There you have it, looks pretty good with out being too complicated.
[You must be registered and logged in to see this image.]
I want to say thanks to Smitty for providing this fun site, Skippy for inviting me to do this build, Ted for showing me how and Keith for the painting lessons along with loads of plug theory.
I enjoyed presenting this build and I hope everyone got at least something from this build. Good luck to anyone that tries it.
One last thing, don’t forget the Saturday night chat at 10 pm, where this plug will be raffled off. See you there.
FJR- S.B.O DONATING MEMBER
- Number of posts : 1577
stevel- S.B.O DONATING MEMBER
- Number of posts : 5196
Re: Week 12 "Monster Build".........FJR......Handcarve Bunker.
![]() eurojett05 2/10/2010, 11:52 am
eurojett05 2/10/2010, 11:52 am
Excellent tutorial FJR. You do make it look easy but it ain't like Steve said. 

eurojett05- Number of posts : 2453
Re: Week 12 "Monster Build".........FJR......Handcarve Bunker.
![]() Kevnmary 2/10/2010, 12:57 pm
Kevnmary 2/10/2010, 12:57 pm
Nice work Frank!
Very informative, I'm going to have my son read and re-read this a couple of times. I'd still like to arrange a date for me to bring him by to see how it's really done since me teaching him is like the blind leading the blind.
Very informative, I'm going to have my son read and re-read this a couple of times. I'd still like to arrange a date for me to bring him by to see how it's really done since me teaching him is like the blind leading the blind.

Kevnmary- Number of posts : 2417
Re: Week 12 "Monster Build".........FJR......Handcarve Bunker.
![]() Murphthesurf 2/10/2010, 1:33 pm
Murphthesurf 2/10/2010, 1:33 pm
Awesome plug and technique... Can you tell me how thick the block of cedar was that you started with. Looks like 3/4 or 1in.. Thank You

Murphthesurf- S.B.O DONATING MEMBER
- Number of posts : 1567
hey
![]() skippy 2/10/2010, 2:00 pm
skippy 2/10/2010, 2:00 pm
you got the talking part done, now I go straight to tripledogdare, do you need wood? oh I forget, clearly you have been throwing a little wood around the house,,, congrats on your blessing....have you started a plugbag for the little rugrat yet?let me know so I can contribute.fishnh wrote:wow. nice sweet step by step. I might have to try one of those
skippy- Number of posts : 1386
Re: Week 12 "Monster Build".........FJR......Handcarve Bunker.
![]() IRON LURES 2/10/2010, 5:59 pm
IRON LURES 2/10/2010, 5:59 pm
awesome tutorial FJR! thanks alot, lots of good info. I really like your plugs, cant wait to fish the red head i got from the swap!

IRON LURES- SPONSOR

- Number of posts : 264
-

Re: Week 12 "Monster Build".........FJR......Handcarve Bunker.
![]() rocstar21 2/10/2010, 11:37 pm
rocstar21 2/10/2010, 11:37 pm
AWESOME JOB ON THE TUTORIAL FRANK 
I LOVE HOW THAT PLUG TURNED OUT BRO........ GONNA MAKE SOMEONE VERY HAPPY!!!
I LOVE HOW THAT PLUG TURNED OUT BRO........ GONNA MAKE SOMEONE VERY HAPPY!!!

rocstar21- Number of posts : 2971
Re: Week 12 "Monster Build".........FJR......Handcarve Bunker.
![]() black talon 2/11/2010, 12:39 am
black talon 2/11/2010, 12:39 am
Frank, very nice tutorial.
you make it look to easy
you make it look to easy
black talon- Number of posts : 342
Re: Week 12 "Monster Build".........FJR......Handcarve Bunker.
![]() bennyraw 2/11/2010, 1:25 pm
bennyraw 2/11/2010, 1:25 pm
Thanks Frank, great tutorial. 
bennyraw- Number of posts : 222
Re: Week 12 "Monster Build".........FJR......Handcarve Bunker.
![]() etch 2/11/2010, 2:09 pm
etch 2/11/2010, 2:09 pm
awesome tutorial, very sexy shaped plug , you do damn fine work
Etch
Etch

etch- Number of posts : 1193
-
Re: Week 12 "Monster Build".........FJR......Handcarve Bunker.
![]() fish factor 2/11/2010, 10:42 pm
fish factor 2/11/2010, 10:42 pm
im gonna give it a shot im shure it wont look as good as yours fjr 
ive always wanted to try my luck at these thanks for the class
ive always wanted to try my luck at these thanks for the class

fish factor- S.B.O DONATING MEMBER
- Number of posts : 2092
Re: Week 12 "Monster Build".........FJR......Handcarve Bunker.
![]() first2wins 2/12/2010, 1:22 am
first2wins 2/12/2010, 1:22 am
your good you

first2wins- Number of posts : 210
Re: Week 12 "Monster Build".........FJR......Handcarve Bunker.
![]() Bluesfish 2/12/2010, 8:14 pm
Bluesfish 2/12/2010, 8:14 pm
Beautiful job Frank  Love the color pattern. Covered all the bases so sven I could follow!!
Bluesfish
Love the color pattern. Covered all the bases so sven I could follow!! Bluesfish
Bluesfish- S.B.O DONATING MEMBER
- Number of posts : 2679
Re: Week 12 "Monster Build".........FJR......Handcarve Bunker.
![]() Gremlin 2/12/2010, 8:49 pm
Gremlin 2/12/2010, 8:49 pm
Great Job. Thanks for taking the time. How do you apply the E-Tex? Do you brush it on? Thin it out?
Thanks, Jamie
Thanks, Jamie

Gremlin- S.B.O DONATING MEMBER
- Number of posts : 452
Re: Week 12 "Monster Build".........FJR......Handcarve Bunker.
![]() FJR 2/13/2010, 10:14 am
FJR 2/13/2010, 10:14 am
Thanks guys for the compliments !!!!! Glad I was able to give something back. I have had the good fortune to get a lot of great info from so many. Anyone wanted to get started in this hobby, this is the place to be.
Jamie - e-tex is brushed on with acid brushes, no thinning, it's thin enough!!!!!!!! Thinning epoxy is not a good thing for top coats.
Blues - FF & anyone else that tries - good luck and remember - practice, practice,practice
Jamie - e-tex is brushed on with acid brushes, no thinning, it's thin enough!!!!!!!! Thinning epoxy is not a good thing for top coats.
Blues - FF & anyone else that tries - good luck and remember - practice, practice,practice
FJR- S.B.O DONATING MEMBER
- Number of posts : 1577
Re: Week 12 "Monster Build".........FJR......Handcarve Bunker.
![]() SALTYDOG 2/13/2010, 2:17 pm
SALTYDOG 2/13/2010, 2:17 pm
JUST FANTASTIC, an the plug is BEAUTIFUL
GOOD LUCK GOOD PLUGGIN :zzzzzzzz:
GOOD LUCK GOOD PLUGGIN :zzzzzzzz:

SALTYDOG- S.B.O DONATING MEMBER
- Number of posts : 332
Re: Week 12 "Monster Build".........FJR......Handcarve Bunker.
![]() Minivin5 2/14/2010, 2:38 am
Minivin5 2/14/2010, 2:38 am
Frank what an excellent build! Your hand carves are something to behold, thanx for sharing

Minivin5- S.B.O DONATING MEMBER
- Number of posts : 1449
Page 1 of 2 • 1, 2 ![]()
» week 6 monster,,,,1/02/10 fill in build for the chat "bunker swimmer"
» "Monster Builds" ,,,,,week 1,,,,skippylures," Broomstick Slug ".....
» Sat-night surf chat,,, Week 16,," Monster Builder ",,,Smitty....
» Week 3 Monster Build...Alphabaits..Handcarved Herring
» "MONSTER BUILD CONFIRMATION"
» "Monster Builds" ,,,,,week 1,,,,skippylures," Broomstick Slug ".....
» Sat-night surf chat,,, Week 16,," Monster Builder ",,,Smitty....
» Week 3 Monster Build...Alphabaits..Handcarved Herring
» "MONSTER BUILD CONFIRMATION"
Page 1 of 2
Permissions in this forum:
You cannot reply to topics in this forum
» Here is your new member from NJ.
» Greetings from the west coast.
» Newbie here
» Cooler Rack for front of truck
» "Purple Heron"
» Another Classic Conversion
» A BAKERS DOZ !
» WINTERS OVER !
» Classic Conversion !