ghost flames a "how to"... (with pics)
4 posters
Page 1 of 1

ghost flames a "how to"... (with pics)
![]() holymackeral 9/19/2010, 2:09 pm
holymackeral 9/19/2010, 2:09 pm
so here's the technique i use to get a ghost type flame. this was done on an rc body but the technique just needs to be reversed to get the same results on things like a plug.
what i used: (the paints i am using are faskolor paints made for rc bodies they are similar to createx and clean up with some water)
airbrush
transparent paint (color is up to you)
pearl silver paint
black paint
home made flame lick templates
you can see here the flame licks i cut out of some blank template material. you can pick some up at a variety of stores. like walmart and michaels. i than cut the flame licks off the template material to make it easier to use them on the inside of the rc body.

first i to put my liquid masking on the inside of the body where the paint will be spayed on. you can use tape or what ever you find the best for masking. for rc's i like liquid mask because of it's transparency.
next i drew the design on the outside of the body. starting with one half of the body. than thru the use of tracing paper i copy the design to the other side.

after this is done and i'm happy with the design i begin to cut out the design on the inside of the body. i cut the whole design out at once. it makes things easier later on. especially when you have a layer or two of paint covering the design. (hard to take pics of the cut out design so sorry no pic for this step)
with rc's you have to start with the darkest colors first whenever possible. and since the ghost flames are the darkest color i am starting with them. so i spray the transparent paint first getting good coverage but not too much since i don't want the purple to show too much. (this is done first because we have to do things in reverse order on rc bodies because we paint them on the inside)

after letting the transparent paint dry enough to work on i start to use my flame templates to lay the flames out using the pearl silver. i try my best to do a bit of a fade. it will make the flames look like they are coming from behind the ones in front. try not to use the same template over and over. you want to mix it up a little. also don't forget to use both sides of the templates. just be careful that the paint is cleaned off or dry on the side you are going to lay down.

now as you are laying out the flames you have to be careful. the paint is still wet on the body and the template it self. so what i try to do is alternate between templates and sides of the body. don't worry about mistakes. with a q tip dipped in water you can erase nearly any mistake you make. just be gentle you don't want to wipe the transparent paint off too. there can be a lot of overspray so just make sure you clean it off as quickly as possible.
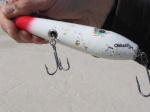
i'm not going to take and post pics of the whole process of laying the flames down. it takes me a couple hours to do this with such a large area to do. i think this picture gives you an idea of what we're trying to do.

so after all the flames are down the whole thing needs to be backed by black. the black will darken the purple. so that way when the light hits the flames they show that much brighter. you can see in this photo what i'm talking about. where the light hits the flames you can really see them. where there is shadow you can hardly if at all see the flames.

now for doing this on let's say a plug. you just need to reverse things. starting with a basecoat of black. letting that dry so you can work on it without messing up the paint. you can clearcoat it but i never had a problem with scratches or anything after letting the paint dry thoroughly.
next you will start laying out the flames with the pearl silver. for your template you can just cut out the flame licks and not have to remove them from the blank template paper. it will help prevent overspray.
finally when all is to your liking and it's all dry you can spray your transpaent paint. what's good about this is you can put as many coats on as you like to get the effect you want. so you can make the transparent paint as light or dark as you feel.
and that's that. please if you have any questions or comments post them up. i'll answer them the best i can.
what i used: (the paints i am using are faskolor paints made for rc bodies they are similar to createx and clean up with some water)
airbrush
transparent paint (color is up to you)
pearl silver paint
black paint
home made flame lick templates
you can see here the flame licks i cut out of some blank template material. you can pick some up at a variety of stores. like walmart and michaels. i than cut the flame licks off the template material to make it easier to use them on the inside of the rc body.
first i to put my liquid masking on the inside of the body where the paint will be spayed on. you can use tape or what ever you find the best for masking. for rc's i like liquid mask because of it's transparency.
next i drew the design on the outside of the body. starting with one half of the body. than thru the use of tracing paper i copy the design to the other side.
after this is done and i'm happy with the design i begin to cut out the design on the inside of the body. i cut the whole design out at once. it makes things easier later on. especially when you have a layer or two of paint covering the design. (hard to take pics of the cut out design so sorry no pic for this step)
with rc's you have to start with the darkest colors first whenever possible. and since the ghost flames are the darkest color i am starting with them. so i spray the transparent paint first getting good coverage but not too much since i don't want the purple to show too much. (this is done first because we have to do things in reverse order on rc bodies because we paint them on the inside)
after letting the transparent paint dry enough to work on i start to use my flame templates to lay the flames out using the pearl silver. i try my best to do a bit of a fade. it will make the flames look like they are coming from behind the ones in front. try not to use the same template over and over. you want to mix it up a little. also don't forget to use both sides of the templates. just be careful that the paint is cleaned off or dry on the side you are going to lay down.
now as you are laying out the flames you have to be careful. the paint is still wet on the body and the template it self. so what i try to do is alternate between templates and sides of the body. don't worry about mistakes. with a q tip dipped in water you can erase nearly any mistake you make. just be gentle you don't want to wipe the transparent paint off too. there can be a lot of overspray so just make sure you clean it off as quickly as possible.
i'm not going to take and post pics of the whole process of laying the flames down. it takes me a couple hours to do this with such a large area to do. i think this picture gives you an idea of what we're trying to do.
so after all the flames are down the whole thing needs to be backed by black. the black will darken the purple. so that way when the light hits the flames they show that much brighter. you can see in this photo what i'm talking about. where the light hits the flames you can really see them. where there is shadow you can hardly if at all see the flames.
now for doing this on let's say a plug. you just need to reverse things. starting with a basecoat of black. letting that dry so you can work on it without messing up the paint. you can clearcoat it but i never had a problem with scratches or anything after letting the paint dry thoroughly.
next you will start laying out the flames with the pearl silver. for your template you can just cut out the flame licks and not have to remove them from the blank template paper. it will help prevent overspray.
finally when all is to your liking and it's all dry you can spray your transpaent paint. what's good about this is you can put as many coats on as you like to get the effect you want. so you can make the transparent paint as light or dark as you feel.
and that's that. please if you have any questions or comments post them up. i'll answer them the best i can.
holymackeral- S.B.O DONATING MEMBER

- Number of posts : 1383
Re: ghost flames a "how to"... (with pics)
![]() vodkaman 9/19/2010, 3:10 pm
vodkaman 9/19/2010, 3:10 pm
Good job HM. Thanks for taking time out to explain. Easy to follow too.
Nice job on the RC's.
Dave
Nice job on the RC's.
Dave
vodkaman- Number of posts : 37


Oldsalts- Number of posts : 2037
-


stevel- S.B.O DONATING MEMBER
- Number of posts : 5196
Re: ghost flames a "how to"... (with pics)
![]() holymackeral 9/19/2010, 10:25 pm
holymackeral 9/19/2010, 10:25 pm
thanks guys.... i never really did a how to so i was hoping i explained things simply so people could understand.... i just thought "if i had to teach myself how to do this how would i do it"...
holymackeral- S.B.O DONATING MEMBER
- Number of posts : 1383
» Green Ghost !
» Help on FLAMES !
» no more flames on the hemi.........
» Simple Flames............bennyraw
» new pics
» Help on FLAMES !
» no more flames on the hemi.........
» Simple Flames............bennyraw
» new pics
Page 1 of 1
Permissions in this forum:
You cannot reply to topics in this forum
» Here is your new member from NJ.
» Greetings from the west coast.
» Newbie here
» Cooler Rack for front of truck
» "Purple Heron"
» Another Classic Conversion
» A BAKERS DOZ !
» WINTERS OVER !
» Classic Conversion !